
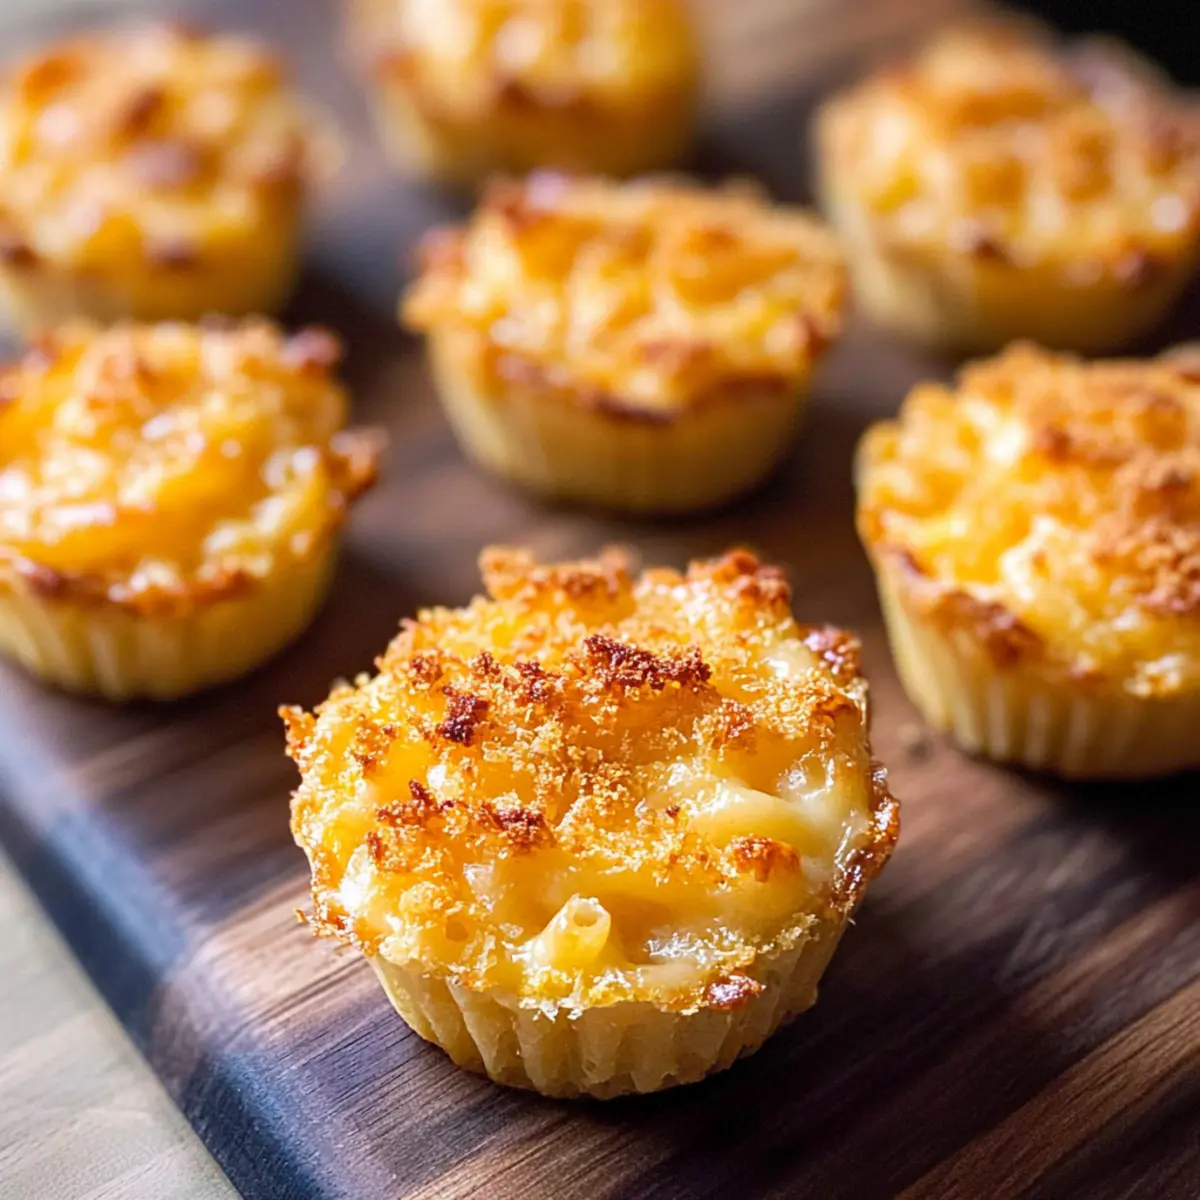
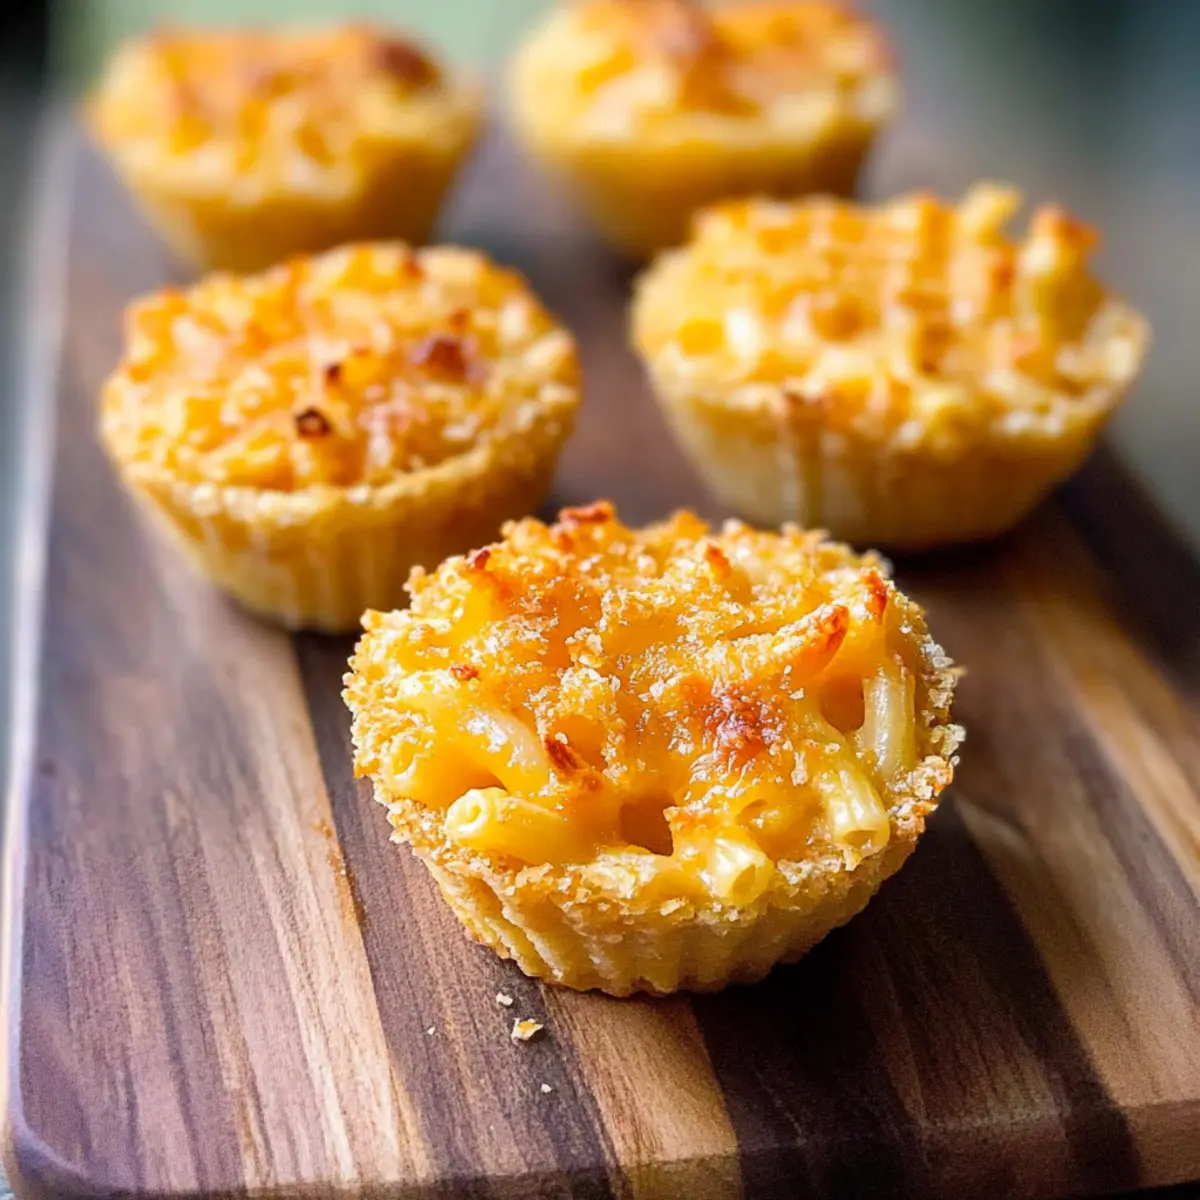
Craving a cozy snack that’s both fun to make and delightful to eat? Let me introduce you to my Baked Mac and Cheese Cups! These little gems are packed with creamy, cheesy goodness and nestled in a satisfying, crispy breadcrumb shell. Not only are they gluten-free and vegetarian-friendly, but they also make for an easy appetizer that can wow your friends at gatherings or serve as a comforting treat for the family on movie night. Whipping up these cups is a breeze—perfect for those quick midweek meals when you want something comforting without the fuss. So, why stick with takeout when you can easily create these irresistible bites at home? Ready to dig into this cheesy goodness? Let’s get started!

Why Choose Baked Mac and Cheese Cups?
Irresistible Miniature Delight: These Baked Mac and Cheese Cups pack all the comforting flavor of classic mac and cheese into bite-sized servings that are perfect for sharing—or not!
Gluten-Free Option: Easily adaptable for gluten-free diets, using gluten-free pasta and breadcrumbs makes these cups accessible to everyone.
Crowd-Pleasing Appeal: Perfect for parties, they are sure to be a hit with both kids and adults, making them a versatile appetizer or snack option.
Quick and Easy: With just a handful of ingredients and straightforward steps, you can whip up a tray in no time—ideal for busy weeknights!
Endless Variations: Customize with your favorite cheeses or add-in veggies to make each batch uniquely yours. Make sure to check out our tips for substitutions and variations to elevate your culinary experience!
Baked Mac and Cheese Cups Ingredients
For the Pasta
• Pasta – Use gluten-free pasta to ensure these baked mac and cheese cups cater to gluten sensitivities while still keeping that comforting baseline.
For the Cheese Sauce
• Butter – Unsalted butter is best, giving you more control over the seasoning of the sauce.
• Garlic – Freshly minced garlic adds wonderful depth to the flavor, making your sauce irresistibly aromatic.
• Salt & Ground Black Pepper – These staples enhance every layer of flavor; adjust according to your taste preferences.
• All-Purpose Flour – Combine this with the butter for a roux that thickens the cheese sauce; use cornstarch as a gluten-free alternative.
• Milk – Whole milk is ideal for a creamy texture; if using alternatives, be mindful that they may change the consistency.
• Cheddar Cheese – Go for freshly shredded cheese for the best melting quality and flavor; avoid bagged cheese for less grit.
For the Topping
• Breadcrumbs – Panko breadcrumbs are perfect for a crunchy topping—adding a delightful crunch to these cheesy bites!
When you gather these ingredients, you’ll be all set to create delicious baked mac and cheese cups that are sure to please both the palate and the family!
Step‑by‑Step Instructions for Baked Mac and Cheese Cups
Step 1: Preheat the Oven
Begin by preheating your oven to 350°F (175°C). While the oven warms up, grab a standard muffin tin and generously grease all 12 cups with butter using a pastry brush or your fingers. This will prevent the Baked Mac and Cheese Cups from sticking, ensuring they come out easily once baked.
Step 2: Cook the Pasta
In a large pot, bring salted water to a rolling boil. Add your chosen pasta—small shapes like elbow macaroni work great for this recipe—and cook until al dente, about 6–8 minutes. Once cooked, drain the pasta in a colander and set it aside to cool slightly while you prepare the cheese sauce.
Step 3: Prepare the Cheese Sauce
In a medium saucepan over medium heat, melt 4 tablespoons of unsalted butter until bubbling. Add freshly minced garlic and sauté for about 1 minute until fragrant, taking care not to let it brown. Once aromatic, stir in salt and ground black pepper, followed by all-purpose flour; cook for another minute, stirring to create a smooth roux.
Step 4: Whisk in the Milk
Gradually whisk in whole milk, ensuring there are no lumps. Keep stirring until the mixture thickens and just begins to bubble, which should take around 3–5 minutes. Remove the saucepan from heat and stir in freshly shredded cheddar cheese, mixing until melted and creamy. This cheesy sauce is the heart of your Baked Mac and Cheese Cups!
Step 5: Combine Pasta and Cheese Sauce
Gently fold the cooked pasta into the rich cheese sauce, ensuring each piece is well-coated. Take your time here—this step is crucial for achieving the ultimate comfort snack. You want every bite of your Baked Mac and Cheese Cups to be bursting with cheesy goodness!
Step 6: Fill the Muffin Tin
Using a spoon, divide the cheesy pasta mixture evenly among the greased muffin cups, filling them to the brim. Press down gently to pack them in slightly, ensuring they hold together during baking. Now, sprinkle a generous layer of breadcrumbs over the top of each cup for that irresistible crunch.
Step 7: Bake to Perfection
Place the muffin tin in your preheated oven and bake for 30–35 minutes or until the tops are golden brown and the edges are bubbly. Keep an eye on them, as you want that perfect crispy topping! A delightful aroma will fill your kitchen, promising delicious Baked Mac and Cheese Cups.
Step 8: Cool and Serve
Once baked, remove the muffin tin from the oven and allow the cups to cool for about 10 minutes. This resting time helps them set. Carefully use a butter knife to loosen edges if needed, then gently lift each mac and cheese cup out using a spoon. Now they’re ready to be served as a fantastic appetizer or delightful snack!
What to Serve with Baked Mac and Cheese Cups
Imagine a cozy gathering where cheesy bites are just the beginning of a delightful feast.
- Crispy Garlic Bread: This buttery classic adds another layer of flavor, complementing the rich cheesiness of the cups. You can even sprinkle a bit of fresh parsley for color and freshness.
- Garden Salad: A fresh salad with crisp greens, cherry tomatoes, and a light vinaigrette balances the creamy richness of the mac and cheese. The crunch of the vegetables provides a refreshing contrast.
- Roasted Vegetables: Vibrant, caramelized veggies like Brussels sprouts or carrots bring both color and texture to the table, making for a wholesome pairing. The slight sweetness from roasting melds beautifully with the savory cups.
- Spicy Marinara Sauce: Serve with a side of spicy marinara for dipping to add a tangy kick that cuts through the creaminess. It’s like a fun twist on traditional mac and cheese!
- Sweet Potato Fries: The slight sweetness and crunch of sweet potato fries offer an exciting contrast, turning snack time into a satisfying meal. They’re a favorite for dipping too!
- Sparkling Lemonade: This refreshing drink adds a zesty backdrop to the meal and cleanses the palate between bites. Its crisp, bubbly nature is a delightful companion to the cheesy goodness.
How to Store and Freeze Baked Mac and Cheese Cups
Fridge: Store baked mac and cheese cups in an airtight container for up to 3 days to keep them fresh and delicious.
Freezer: To freeze, place cups in an airtight container or freezer bag, separating layers with parchment paper. They can be stored for up to 2 months.
Reheating: When ready to enjoy, thaw the frozen cups overnight in the refrigerator. Reheat in a preheated oven at 350°F (175°C) for about 15-20 minutes to regain that crispy topping.
Make-Ahead Tip: Consider preparing extra batches of baked mac and cheese cups. They freeze beautifully, making them a convenient snack option for busy days!
Expert Tips for Baked Mac and Cheese Cups
- Cheese Choice: Always use freshly shredded cheese from a block for the best melting qualities. Pre-shredded cheese contains anti-caking agents that can affect texture.
- Pasta Perfection: Make sure your pasta is al dente; overcooking it can lead to mushy cups. Aim for about 6-8 minutes in boiling water.
- Avoid Sticking: Generously grease the muffin tin with butter to prevent your baked mac and cheese cups from sticking. If they do stick, a gentle run with a butter knife can help.
- Gluten-Free Substitutes: For a gluten-free option, swap regular flour with cornstarch, and ensure your pasta and breadcrumbs are gluten-free.
- Creative Add-ins: Feel free to add cooked vegetables or proteins like bacon or chicken to enhance flavors. Just keep in mind not to overfill the cups!
- Storing Leftovers: Store any extras in an airtight container in the fridge for up to 3 days. Reheat in the oven for maintaining crispiness on top.
Baked Mac and Cheese Cups Variations
Feel free to make these delightful Baked Mac and Cheese Cups truly yours with these fun swaps and additions!
- Dairy-Free: Replace milk with a plant-based alternative and use vegan cheese for a delicious dairy-free version.
- Spicy Kick: Add a pinch of cayenne pepper or a few dashes of hot sauce to the cheese sauce for a zesty flavor boost.
- Vegetarian Delight: Incorporate cooked vegetables like sweet bell peppers, spinach, or shredded carrots for added nutrition and color.
- Meaty Twist: Fold in cooked crumbled sausage, crispy bacon, or diced ham to elevate these bites into a heartier snack.
- Herbaceous Fun: Mix in fresh herbs like basil or parsley into the cheese sauce for a burst of freshness that brightens each cup.
- Smoky Flavor: Use smoked cheddar cheese or add a few drops of liquid smoke to replicate that barbecued taste without grilling.
- Pasta Alternatives: Try using quinoa or riced cauliflower instead of pasta for a lower-carb variation that still packs on the flavor.
- Flavorful Toppings: Experiment with toppings like cracked nuts or crispy onions in place of breadcrumbs for a crunchy surprise.
When it comes to crafting the perfect Baked Mac and Cheese Cups, your imagination is the limit! You might even want to explore our tips for substitutions and variations to discover even more creative possibilities!
Make Ahead Options
These Baked Mac and Cheese Cups are perfect for busy home cooks who want to save time during the week! You can prepare the pasta and cheese mixture up to 24 hours in advance. Simply cook the pasta as instructed, then mix it with the cheese sauce and refrigerate in an airtight container. This not only helps in meal prep but also allows the flavors to meld beautifully overnight. When you’re ready to bake, divide the chilled mixture into the muffin tin, sprinkle with breadcrumbs, and bake as directed. This way, you’ll have delicious, comforting snacks ready to hit the table with minimal effort, just as delightful as if made fresh!
Baked Mac and Cheese Cups Recipe FAQs
How do I select the right pasta for my Baked Mac and Cheese Cups?
Absolutely! For the best structure and flavor, opt for smaller pasta shapes like shells, elbows, or gemelli. These shapes hold the cheesy sauce well and allow for easier filling in the muffin cups.
What is the best way to store leftovers of Baked Mac and Cheese Cups?
Very! Store any leftover Baked Mac and Cheese Cups in an airtight container in the refrigerator for up to 3 days. To enjoy them later, simply reheat in the oven to maintain their delicious, crispy texture.
Can I freeze Baked Mac and Cheese Cups?
Absolutely! To freeze, let the baked cups cool completely. Place them in an airtight container or a freezer bag, separating layers with parchment paper to prevent sticking. They can be stored for up to 2 months. When you’re ready to eat, thaw them overnight in the refrigerator and reheat in a preheated oven at 350°F (175°C) for about 15-20 minutes until heated through.
What should I do if my Baked Mac and Cheese Cups stick to the muffin tin?
No worries! If the cups stick, gently run a butter knife along the edges to loosen them before carefully lifting them out. To prevent sticking in the first place, make sure to generously grease the muffin tin with unsalted butter before adding the pasta mixture.
Are Baked Mac and Cheese Cups gluten-free?
Yes! You can easily make gluten-free Baked Mac and Cheese Cups by using gluten-free pasta and breadcrumbs. Moreover, replace the all-purpose flour in the cheese sauce with cornstarch for a smooth and creamy texture without gluten.
Can I customize the ingredients in Baked Mac and Cheese Cups?
Very! Feel free to swap out the cheddar cheese for Monterey Jack or Gouda for different flavors. You can also add cooked vegetables like broccoli or chopped spinach for extra nutrition or cooked bacon for a savory twist. The more, the merrier!

Baked Mac and Cheese Cups: The Perfect Comfort Snack
Ingredients
Equipment
Method
- Preheat your oven to 350°F (175°C) and grease a muffin tin with butter.
- Boil salted water in a large pot, add pasta, and cook until al dente, around 6-8 minutes. Drain and set aside.
- In a saucepan, melt butter and sauté garlic until fragrant, then stir in salt, pepper, and flour to create a roux.
- Gradually whisk in milk, cooking until thickened, then remove from heat and stir in cheddar cheese until melted.
- Combine cooked pasta with cheese sauce, ensuring all pasta is well-coated.
- Spoon the mixture into the muffin tin, filling each cup and topping with panko breadcrumbs.
- Bake for 30-35 minutes until golden brown, then cool for 10 minutes before serving.
Leave a Reply